A bracelet is sized to a wrist, not to a neck and not to a guess. In Orlando that number matters more than people expect: heat and humidity swell a wrist by afternoon, hotel pools and park weeks change how metal sits, and a cuff that felt perfect in an air-conditioned room can feel tight on International Drive at three o’clock.
Guide
How to measure a wrist for a bracelet
Write sales@tabaconda.com after you measure. Send the wrap, the family, and how you want the piece to sit.
Tape versus a paper strip
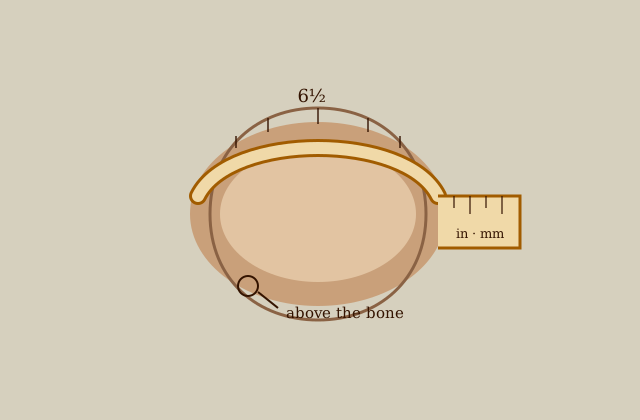
A soft tailor tape is the easiest tool. It lies flat, it has inches on one side and centimeters on the other, and it does not stretch the way a piece of yarn will. Wrap it just above the wrist bone, toward the elbow, not toward the fingers, with the palm open and the hand relaxed.
Measure twice. If the two numbers disagree, measure a third time and keep the middle reading. Do the wrap at the end of the day if you can. Wrists are often a little larger after heat, salt, and walking, the ordinary Orlando afternoon, than they are at breakfast.
Wrap above the wrist bone
| Wrist | Stack |
|---|---|
| Park week | Beads, color, a cuff that can get wet-adjacent |
| Hotel dinner | Chain next to a bright band |
| Gift | Measure first, then pick the loud piece |
Feel the knobby bone on the outside of the wrist (the end of the ulna). A bracelet rests just above that bone, on the narrower part of the forearm, not on the hand and not on the widest part of the joint.
Sit or stand with the palm up and the fingers loose. Do not make a fist. Do not flex. A flexed wrist is thicker; a tape pulled over a fist is a hand measurement, which is the number for a closed bangle that has to slide over knuckles, not the number for a cuff or a chain that opens.
Snug, not tight
The tape or paper should lie against the skin without compressing it. You should be able to slide a fingertip under the tape. If the skin bulges around the tape, it is too tight and the number is too small. If you can fit two fingers under it, it is too loose and you are measuring ease instead of the wrist.
Snug is the wrap. Ease is what you add after, and it is not the same for every family. A cuff that is meant to hug the wrist uses the wrap almost as-is. A chain that is meant to move uses the wrap plus room so the links can rotate. A bracelet that will hold added pieces needs still more room because the pieces occupy length and thickness.
Jewelers commonly describe three sits from the same wrap: close, comfort, and loose. Published sizing notes vary on the exact fractions. Some add a quarter inch for close and about an inch for comfort, so do not treat any one chart as a law. Send the wrap, then say close, comfort, or loose in ordinary English.
Inches and millimeters
Write the wrap in the unit on your ruler. Inches are the usual U.S. jewelry conversation. Millimeters are finer. One inch is 25.4 millimeters. If you can, send both.
A photo of a wrist with no scale, a clothing size, or a neck length is not a wrap. This is the wrist.
Open-cuff gap, hinged-cuff span, chain ease, slider
The wrap is one number. Each family asks a different question of that number.
Open cuff. A band with a gap. The inside length of the metal plus the gap should match how you want the cuff to sit. The gap is how the cuff goes on. It slides from the side, over the narrow part of the wrist, and then rests. Too wide a gap and the cuff walks off when you move. Too narrow a gap and you will flex the metal every time you put it on, which is how a cuff goes out of round. If you already wear one that fits, measure its inside length and its gap and send those too.
Hinged cuff. The number that matters is the inside span when the cuff is shut. Wrap plus a little room so the hinge and the catch do not pinch. Name the join if you care: a box catch, a hidden clasp, a simple hinge. “It opens like a gate and clicks” is enough.
Chain. Links have to move when the wrist bends, and the clasp has to sit where it does not dig. Add ease to the wrap rather than sending the wrap alone. If the chain will sit next to a cuff, the chain often wants a little more ease so it does not saw against the cuff.
Slider. Set after it is on. You still send the wrap. Then say how much ease you want once the slider is where you will wear it. A slider is how you fine-tune a wrap you already trust.
Bracelet that takes added pieces. Measure it like a chain. The starter length is the bracelet, not the pieces you might hang later. If you already know you will add pieces, ask for a little extra ease so the bracelet does not go tight as the line fills.
What to write
Use the form. Messages go to sales@tabaconda.com.
- The wrap, with the unit (inches, millimeters, or both)
- Whether you measured with a tape or a paper strip
- The family: open cuff, hinged cuff, chain, slider, or a bracelet that can take added pieces
- How you want it to sit: close, comfort, or loose
- Whether it will stack with other pieces, and how many
- Whether it will share the wrist with a watch
- Anything Orlando-specific that changes the sit: a park week, a hotel-pool week, a job that is outdoors along I-4, a Lake Nona commute, downtown walking around Lake Eola
If you are buying for someone else, measure their wrist. If you are not with them, ask them to wrap a paper strip, photograph the strip next to a ruler, and send that.
When the wrap is written, the wrist-measure / stacking kit is tape, stacking bangles, a chain, a cuff, and a small pouch. A rigid bangle versus a chain is on the compare page.